Windows服务能做些什么?
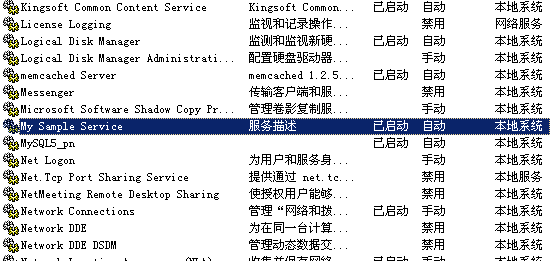
Windows服务是这些后台程序、后台服务的正规名词。Windows服务的运行可以在没有用户干预的情况下,在后台运行,没有任何界面。通过Windows服务管理器进行管理。服务管理器也只能做些简单的操作:开始,暂停,继续,停止。Windows服务的特点:在后台运行,没有用户交互,可以随Windows启动而启动。
如何实现Windows服务?
下面按”隔一定时间做一些相同的事情”的服务为例,说明Windows服务如何实现。
**1.先按普通Windows程序设计好你的程序逻辑。 **
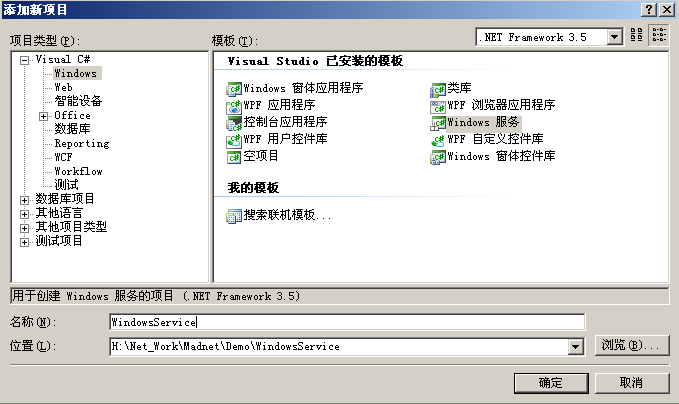
建立一个空白解决方案WindowsService.sln
添加Windows类库项目ServiceBLL.csproj
将Class1.cs改名为AppBLL.cs
添加一个方法Dothings(),这个方法用来每隔一段时间调用一次,做些周期性的事情。
namespace ServiceBLL
{
    public class AppBLL
    {
        public void Dothings()
        {
            //隔一段时间调用一次
            LogHelper.WriteLog("test");
        }

    }
}
**2.向解决方案添加一个WindowsService.csproj **

将Service1.cs重命名为Service.cs
给WindowsService添加ServiceBLL项目引用
打开Service.cs代码视图,向Service类添加成员
ServiceBLL.AppBLL appBLL;
在构造函数里面对appBLL实例化
appBLL= new AppBLL ();
在using位置添加System.Theading
using System.Threading;
给Service类添加计时器
Timer serviceTimer;
添加TimeCallback方法,用于计时器调用
public void TimerCallback(object obj)
{
    //隔一段时间调用一次
    appBLL.Dothings();
}
在OnStart()方法中添加方法,用于启动计时器
serviceTimer = new Timer(new TimerCallback(TimerCallback), state, 0, period);
此处,state用于保存状态,如果不需要,保存状态,可以传入null。第三个参数0表示立即调用TimerCallback方法,如果不需要立即调用,可以传入period。period是计时器的计时间隔,单位为毫秒。
重载 OnPause ()和OnContinue ()方法,对计时器进行控制。
Service.cs代码如下
using System.ServiceProcess;
using System.Threading;
using ServiceBLL;

namespace WindowsService
{
    public partial class Service : ServiceBase
    {
        private Timer serviceTimer;
        private AppBLL appBLL;
        private int period;
        private object state;

        public Service()
        {
            InitializeComponent();
            appBLL = new AppBLL();

        }

        protected override void OnStart(string[] args)
        {
            //启动timer
            period = 10*1000;//10秒,可从配置文件中获取
            serviceTimer = new Timer(new TimerCallback(TimerCallback), state, 0, period);
            LogHelper.WriteLog("OnStart");
        }

        protected override void OnStop()
        {
            //停止计时器
            serviceTimer.Change(Timeout.Infinite, Timeout.Infinite);
            LogHelper.WriteLog("OnStop");
        }

        protected override void OnContinue()
        {
            //重新开始计时
            serviceTimer.Change(0, period);
            LogHelper.WriteLog("OnContinue");
        }

        protected override void OnPause()
        {
            //停止计时器
            serviceTimer.Change(Timeout.Infinite, Timeout.Infinite);
            LogHelper.WriteLog("OnPause");
        }

        public void TimerCallback(object obj)
        {
            //隔一段时间调用一次
            appBLL.Dothings();
        }

    }
}
Program.cs代码如下
static class Program
{
    /// <summary>
    /// 应用程序的主入口点。
    /// </summary>
    static void Main()
    {
        ServiceBase[] ServicesToRun;
        ServicesToRun = new ServiceBase[]
            {
                new Service()
            };
        ServiceBase.Run(ServicesToRun);
    }
}
**3.将这个服务程序切换到设计视图 **
右击设计视图选择”添加安装程序”
切换到刚被添加的ProjectInstaller的设计视图
设置serviceInstaller1组件的属性:
ServiceName = My Sample Service
StartType = Automatic (开机自动运行)
设置serviceProcessInstaller1组件的属性 Account = LocalSystem
**4.安装和卸载服务 **
- 手动安装服务
访问项目中的已编译可执行文件所在的目录。
用项目的输出作为参数,从命令行运行
InstallUtil.exe。在命令行中输入下列代码:
installutil yourproject.exe
- 手动卸载服务
用项目的输出作为参数,从命令行运行
InstallUtil.exe。在命令行中输入下列代码:
installutil /u yourproject.exe
另一种方法:从命令行运行 sc delete 服务名
3)安装Windows服务的批命令如下:
@ECHO OFF

REM The following directory is for .NET2.0
set DOTNETFX=%SystemRoot%\Microsoft.NET\Framework\v2.0.50727
set PATH=%PATH%;%DOTNETFX%

cd\
cd "H:\Net_Work\Madnet\Demo\WindowsService\WindowsService\bin\Debug"

echo 正在安装 测试服务...
echo ---------------------------------------------------

InstallUtil /i WindowsService.exe
echo ---------------------------------------------------

echo Done.
exit
4)卸载Windows服务的批命令如下:
@ECHO OFF

REM The following directory is for .NET2.0
set DOTNETFX=%SystemRoot%\Microsoft.NET\Framework\v2.0.50727
set PATH=%PATH%;%DOTNETFX%

cd\
cd "H:\Net_Work\Madnet\Demo\WindowsService\WindowsService\bin\Debug"

echo 正在卸载 测试服务...
echo ---------------------------------------------------

InstallUtil /U WindowsService.exe

echo ---------------------------------------------------

echo Done.
exit
5.调试服务
1)安装您的服务。
2)可从服务控制管理器、”服务器资源管理器”或代码启动服务。
- 用Visual Studio装载这个项目,从”调试”菜单中选择”进程”。出现”进程”对话框。
4)单击”显示系统进程”。
5)在”可用进程”区域内单击服务的进程,然后单击”附加”。(提示 此进程将与服务的可执行文件同名。)出现”附加到进程”对话框。
6)选择任意适当选项,然后单击”确定”关闭对话框。(注意 您现在已处于调试模式。)
7)设置要在代码中使用的任意断点。
8)访问服务控制管理器并操纵您的服务,并发送停止、暂停和继续命令以命中您的断点
